Wednesday, June 27, 2012

keepin' it classy, curriculum style.

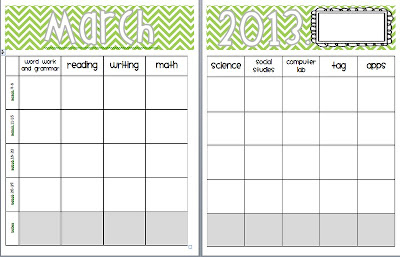
Prepare yourself. Blasphemy is about to slip from my lips: curriculum documents drive me nuts. Sorting through the endless tables, coded specifications, and learning progressions makes me want to pull my hair out. But, let's be honest, it's a necessary evil. As much as I would LOVE to teach my kids about daisies and butterflies all day, if I want to keep my job and mold well-rounded learners, I better be sure my instruction is tightly aligned with our state's specifications and district's curriculum. So how can I do that without having to weed through all of those curriculum documents each week? With this:

These documents could be used for a lesson plan book, but I created these to help our team stay organized and aligned with district curriculum next year. My plan is to spend the summer looking at all of our district's curriculum documents and condensing them down to these pages. I will break down each nine week's curriculum into a weekly table where I will list each content area's curriculum along with ideas for activities that I want to discuss with the team at our weekly planning meeting.

On the document, I also included a grayed-out section for us as a team to take notes during our planning meetings. The loopy box next to the year (which I found at Clip Art by Carrie www.ccteachfirst.blogspot.com) is where I will include notes and reminders for the team (i.e. professional development dates for the month, holidays, report card due dates, etc.).

My plan is to print these pages out in a booklet format so that I can bind these pages along with a couple other important school-wide documents and disperse these to each person on our team. Each week, we will use these documents to guide our discussion in our team planning meeting.

I have uploaded an editable Word document of the 2012-2013 curriculum calendar to my TPT store! This will allow you to edit and fill in the tables to match your district's curriculum. If you want your Word version to match mine, you will need the following fonts installed on your computer:
  • Wish I Were Taller (www.kevinandamanda.com)
  • Smiley Monster (www.kevinandamanda.com)
  • Caitlin (http://reallyquitelucky.blogspot.com/p/fonts.html)

  • These documents will keep our team organized and aligned with our district's curriculum.
  • Rather than pulling up all of our district's curriculum documents on a weekly basis, we have all of the information from the documents in one, concise reference document.
  • These documents also include a place to note the apps that we find that are tied to that week's curriculum.
  • By including a space to include schedule-related notes (holidays, professional development dates, report card due dates, etc.), our team will stay informed and on-top of our extracurricular tasks.

Maybe those curriculum documents won't be so bad after all...

Friday, June 22, 2012

bamboo bonanza.

Several months ago, I began sharing my asylum-worthy obsession with campaign furniture with y'all. If you have some Go-Go-Gadget eyes, you may have spied an accessory that each of those campaign pieces had that I also hearted. If you didn't spy it then, see if you can spy it now:


Even the Craigslist master herself, Emily A. Clark is loving her some campaign accessories:

If you haven't spotted the accessory I am hearting by now, forget about having Go-Go-Gadget eyes - you should probably go see an optometrist. Pronto.

How wonderful are those octagonal, double-framed, bamboo mirrors, y'all?! I was lucky enough to have a visually-gifted aunt who spotted those lovely mirrors only moments after I posted about my campaign obsession. Not only did she call me up to chat about our brass-laden loves, but she also let me know that she had a PAIR of bamboo mirrors that she didn't need anymore! Como te what?! You better believe that I practically CARRIED Mr. Spouse to the car to go snatch those puppies up immediately.

After sprucing up our campaign china hutch, I just knew that our newly acquired bamboo mirrors would be the perfect frame for our new piece:

I absolutely loved the shape and texture that the mirrors brought to the space, but after living with it for a couple of weeks, something was a little off. I felt like the dark gold coloring of the mirrors was making the light, airy room seem a bit dull - the mirrors weren't popping off the walls like I wanted.

Also, the mirror frames had some black splatters that I felt weren't allowing the twins to be as bright and fabulous as they possibly could be.

I decided that I definitely wanted to paint the frames to brighten them up a bit, but I couldn't decide on a color. I considered painting the frames white to coordinate with the white  dishes I displayed in the hutch, but then I thought that if I really wanted the mirrors to pop, why not really make them POP. So off to Home Depot I went, where I quickly snatched up some of Martha Stewart's Metallic Paint in Golden Pearl.

I loved the idea of having something metallic in our dining room! I also felt like the light shade of this gold would bring out the brass finishes on our campaign hutch.

I placed the mirrors on top of some boxes so that I would be able to paint to the very edge of the frames, and placed a drop cloth underneath everything.

I used a 1-inch brush, and got to painting!

Since the surface of the frames was very smooth and slick, I put the first coat of paint on very lightly so that the other layers of paint would have something to grab. 

You might have noticed that I didn't tape off my frames, and as you can see, I shamelessly and carelessly painted that metallic goodness onto the frame (and mirror):

If you haven't painted a mirror before, you might find yourself wanting to become a professional mirror-frame-painter (yes, that's the technical term) because they are the easiest things to paint! Forget about taping to prevent paint perils, once you have finished your painting, all you have to do is wipe and scrape off your "oopsies" from the mirror (more on that later)! Easy peasy, lemon squeezy.

After one coat of paint, the frames were looking smashing, but the dark gold was still visible, along with the black splatters.

I applied two more coats of metallic paint (making three coats total) and was absolutely floored by the results! I loved how you could still see some texture beneath the paint:

I also loved how Golden Pearl color really brightened up the mirrors. I feel like the brighter color makes the bamboo features really stand out as well:

But after three coats of paint, the mirrors needed a little bit of sprucing up.

If you only apply one coat of latex paint to a mirror, the excess paint that gets on the frame can be easily removed by simply wiping the paint with a wet sponge. However, since my frames needed three coats of paint, I felt like I could save myself a little elbow grease by using a razor blade to gently scrape off the excess paint rather than having to scrub off three layers of paint. Once the paint dried completely and being careful not to scratch the mirror, I simply scraped up all the paint that had gotten onto the mirror with a razor blade.

The paint came off of the mirror like butter and left a fabulously clean line between the frame and the mirror.

Once all of the paint had been removed from the mirror, I spritzed away my fingerprints with a bit of Windex...

...and re-hung the mirrors!

I love how the mirrors look so much brighter in the space and that the bamboo really pops to give the space more texture and interest:

The gold is shiny, without being blinding and helps the brass on the campaign piece stand out as well.

With these two additions to our dining room, I feel like the space is finally coming together! Mr. Spouse keeps saying he feels like our home actually looks like grown-ups live there. Victory? I think so.

Tuesday, June 19, 2012

delicious dining.

I like to eat. Like really like to eat. It's a bit unfortunate how much I like to eat. To that end, it was so important to me to make our dining room deliciously delightful. One component of my goal to create a delightful dining room was our campaign hutch that got a little facelift.

One of my other favorite pieces of our dining room was this Arcadia table that we picked up at World Market several months ago. We loved several aspects of this table: I was truly, madly, deeply passionate about the fabulously chunky legs on the table while Mr. Spouse was over the moon about the extension leaves that added on a good three feet to the table.

**Side note regarding the extension leaves: I eat with my elbows at 90 degree angles (much better for aggressive cutting and scarfing techniques). Therefore, by adding on three feet to the table, Mr. Spouse is in far less danger of falling victim to my flailing elbows.

We had also purchased an indoor/outdoor rug that featured a chocolate brown, Moroccan, trellis pattern  prior to the move. I loved the modern feel of the rug, but I also was ga-ga over the fact that it was indoor/outdoor as it would be laughably easy to clean and durable.

But let's re-cap: we have a smoky gray campaign hutch, a chocolate brown table, and a chocolate brown rug. That's a whole lot of smoky and chocolate for one space. So when it came to the chairs, I knew I was going to have to use the chairs to brighten up the space.

Several months ago, I found these dining chairs at a local consignment shop in desperate need of my loving touch:

I know, I know, I probably should have left them just the way they were and placed them in my delicious dining room, right? But oh, the potential they had!

To begin their journey to fabulosity, I flipped the chairs over and found the screws that were holding the cushions onto the wood frame:

I then unscrewed each of those screws to separate the cushion from the frame:

Once the cushions were off, I lightly sanded each chair, being sure to smooth down any deep scratches or dings. I then used TSP Heavy Duty Cleaner to give me a nice, clean surface to paint:

Once the chairs were sanded and cleaned, they were ready to paint. That's where things got interesting, but fun. I initially thought that I would be spray painting the chairs - I thought that this would give me the cleanest look and be the easiest in terms of application. But after searching every home improvement store in the land, I couldn't find the right color for my chairs. I really wanted to find a light, smoky blue, but all of the blues I could find were either too "baby" or too "slate". That's when I remembered that my father-in-law painted their kitchen cabinets by himself using this puppy:

That's right: the MAGNUM SPRAY PAINTER (to be read in your deepest, most guttural voice). I mean, with the word MAGNUM in it, how could it be bad?! This spray painter would allow me to do a couple of things: I could have a wider variety of paints to choose from, as I could use any indoor paint with this MAGNUM spray painter. I would also still achieve the smooth, glossy finish and easy application I would have gotten with a can of spray paint, but still with a color that I actually really loved.

With my new freedom to choose any paint I could find, I headed to Home Depot where I found this perfectly perfect light, blue gray, fittingly named "Liberty Gray". God Bless America.

I picked up one gallon of Zinnser primer and two gallons of "Liberty Gray" as I was planning on applying one coat of primer to my eight chairs and two coats of the color.

After laying out my tarp, hooking up the MAGNUM spray painter...

...and applying a very fine, even coat of primer, the chairs were looking smashing:

The primer went on pretty well, but was a bit thicker in some places than others. Further, the primer dried a bit roughly in some areas of the chairs. So after letting the primer dry for several hours, I then very very lightly sanded the chairs just to smooth out any inconsistencies and to have a nice, even finish.

After sanding the primer, I moved to working on applying my first set of Liberty Gray. The wonderful thing about the MAGNUM spray painter is that the paint does come out in an extremely fine mist. I therefore just used an even sweeping motion to insure that the paint went on smoothly and evenly on all surfaces of the chairs.

Once the first coat dried, I did sand again, but only in those spots that either had drip marks or uneven areas. Finally, it was time for the final coat of the Liberty Gray!

Be still my America-loving heart. Liberty Gray, you didn't let me down!

When it came to choosing a fabric for the seat cushions, I wanted another light color, but something neutral since the blue of the chairs was a bit of a statement. Therefore, I chose a simple khaki fabric and after re-covering and screwing the cushions back onto the frame, the dining room chairs were considered done and done!

I love how they brighten up all of our darker pieces:


I love how the khaki of the seat cushions brings out the trellis pattern on our rug:

So now that all is said and done, we have a deliciously delightful dining room!

Have y'all ever painted dining chairs? How did it go? Are you pleased with the results?

Thursday, June 14, 2012

teacher by day, upholsterer by summer.

A couple of week's ago, Jenn over at Little Green Notebook wrote a little diddy about upholstering a Parsons table, an idea she had gleaned from Matters of Style.

Drool. My heart melted like a popsicle on the Fourth of July. Let's discuss: the fact that I could take a table from Ikea, wrap it in some of my fave fabric, and have a swoon-worthy result is like Christmas in a Swedish box.

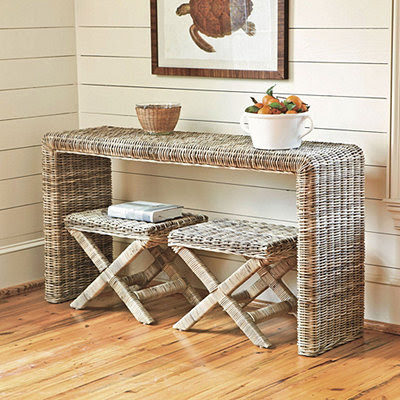
I started this little project by heading over to my fabulously cheap fabric outlet. I decided I wanted a fabric that would be sturdy enough for a table, have some sort of print that was bold without taking over the room, and that was a different texture than anything I already had in the room. I also was mildly in love with this console table from Ballard and it's earthy, textured feel:

After a little bit of digging in the fabric trenches, I came across this bamboo-ish, grass-ish, woven-ish make.my.heart.stop. fabric:

Want even better news? It was $8 per yard. I'm so sorry, como?! This would mean that after buying my $70 table from Ikea and $32 worth of fabric, I would have a hallelujah table in no time! Eat my dust, Ballard $600 console table!

I practically skipped to Ikea and snatched up my 75-inch table, and could hardly wait to get it out of the box and put it together! Once the table was constructed, I rolled out my fabric and placed the table face-down on top of the fabric.

I used a staple gun to staple the fabric into the "feet" of the table first:

I then began wrapping the fabric around each of the corners on the table like I was wrapping a gift for nice, smooth edges:

With the legs finished, I then wrapped the fabric around the "top" part of the table, being sure to pull it very tightly:

To make a nice edge on the second side of the fabric, I simply tucked the edge of the fabric, creased it, then stapled the fabric into the table. So sorry I forgot to document that part!

After finishing the top of the table, I flipped that puppy over and was so thrilled with the results!


I love the texture that the grasscloth adds to the table - it's just a subtle spice that I think adds so much to the space!

I paired the table with some blue, blown-glass lamps I found at HomeGoods and my mercury glass candlesticks.

I love the mix of the earthly fabric with the color of the lamps...

and the shiny-ness of the candlesticks.

One of my next projects will be to re-upholster some x-benches to place under the table for aesthetic loveliness and extra seating (after I get the cord confusion under control, of course).

Have y'all ever upholstered a table? How did it go?